

As I said that I will post a DIY mod for led DRL on strip light when I am done, here it is. This mod is especially for guys like me who want led DRL on strip light and don't have much $ for current price of oem touring headlights replacement mod. I did this by myself and if you have some helper it will be easier to remove the front bumper. Moderators, please move this post to where you think it should be or delete it if someone already posted.
What you need:
Drill and drill bits.
Any household 110 vac to 12 vdc adapter.
Soldering iron, solder, electric tape.
Quiksteel Epoxy Putty to seal the strip light after it is in place.
Liquid tape (option) to seal all connectors.
Add-a-Circuit with a 5 amp fuse for Acc power line to run led DRL every time car is in Acc position.
14 or 16 gauge wire, Flex tubing (12ft or longer), Quick Connects.
Most of items above can be found at Wal-Mart.
![]()
Finally, the led DRL from exLED. Those who want this led DRL changes from white color to amber when make a turn signal should order with additional TPC ver.2.
exledusa.com
Step 1:
Make sure the led DRL shipped to you are working fine before remove the front bumper. The led DRL bar has 3 small wires in black, white and yellow color. Black wire is common negative. White is positive wire for DRL, and yellow is positive wire for amber turn signal led. Plug in the household ac-dc adapter, make sure you know on the dc-in plug which one is negative and positive by look at the label on the transformer, then while touching the black wire to negative of dc-in plug, touch the white wire from led DRL bar to the positive of dc-in plug, all white leds should lit now. Do same to test amber led and use yellow wire instead of white wire. Assume that nothing goes wrong then move to next step.
![]()
Step 2:
Remove battery connectors
Refer to this video to remove the front bumper:
Also download fog light installation PDF file from CH Honda for more bumper removal instruction: http://www.collegehillshonda.com/ho...onda.com/honda-accord-sedan-accessories/2013-honda-accord-sedan-accessories.htm . Remove top bumper only.
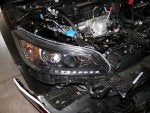
Step 3:
Remove 1 plastic clip and 4 screws to take the headlight out. You will need a ratchet with an extension at least 6 inches to remove a bottom screw under strip light on the horn side. If it is too hard for you to get the whole headlight assembly out then refer to the video to take the bumper off for easier. Remove all harnesses, bulbs. Take left and right headlight out by slightly lift up and toward the front.
![]()
Step 4:
There is a logo ExLed on the TPC module. Wires from letter E are input, and the other side is output. Connect 3 wires from output on TPC module to the same wire color on the led DRL bar. Use soldering iron to solder 3 wires in same color together. Tape around all 3 wires to be 1 harness with electric tape. For those who doesn't want to use the amber led to be additional turn signal then just make the harness with electric tape from led DRL to about 4 inches to the end ( you don't order TPC module anyway). Use pliers to clip a male connector to each wire.
![]()
Step 5:
Drill the strip light socket hole wider for sliding the led blocks into strip light space using a 1/4" or bigger bit.
![]()
Step 6:
Slide led DRL bar into the hole. The bar is slightly curve in the bottom to fit perfect in. Make sure the led blocks face to front so you can see the lights,
Step 7:
Test leds again using step 1. If it is OK then while holding the harness, seal the hole with Quiksteel Epoxy Putty. Continue to hold the harness for 5 minutes to set the putty. Test leds one more time. Use liquid tape to double seal the putty and blend the color to black as headlight housing.
Step 8:
Make a short 1 foot ground wire with a female connector on one end. Attach the other end to car chassis.
Step 9:
On the left under driver sidekick, there are 3 black rubber holes. Remove the bottom one. Run ACC power wire to the front left fender by using a metal clothing hanger, straight it out and tape the wire to one end. Take 2 clips off on the small part close to driver side wiper then lift it up so you can see the hanger. Pull the hanger to front with ACC power wire all the way to the left headlight (passenger side). Use Flex Tubing to cover this power wire. Tap a short wire from this ACC power wire for right headlight DRL. Connect a female connector to each of these ACC power wire.
Step 10:
Tap a wire to the turn signal. There are 3 wires in that harness, and the wire in Blue/Gray is turn signal wire. Connect a female connector to the other end.
Step 11:
Pull fuse number 37 under driver sidekick panel. Plug that same fuse to Add-a-Circuit slot. Add a 5 amp fuse to other slot (straight to the red wire out). Connect battery cables. Turn the car key to ACC position only, don't crank the engine. Test the headlight DRL by plugging the ground wire from headlight to the female connector you attached to car chassis, and plug the ACC power wire to the male connector of the white color. The DRL should light. Test amber led turn signal on the led bar by turning on right turn signal lever then plug yellow wire with male connector to the female on tapped wire. The led on DRL should change to amber color and blink. Do the same test for left lights.
Step 12:
Do the same for left headlight.
Step 13:
Now, your job is using electric tape to tape all the wires and connectors. Make them neat and clean. Tied wrap or tape them to other nearby harness. Mount the headlight assembly units back. Mount the bumper back. DON'T FORGET TO PULL OUT FUSE # 2 on sidekick panel to disable factory DRL function.
Enjoy your new led DRL and save $.
Note: sorry, I have more pictures from step 6, but it said I only can upload max 5 files.
What you need:
Drill and drill bits.
Any household 110 vac to 12 vdc adapter.
Soldering iron, solder, electric tape.
Quiksteel Epoxy Putty to seal the strip light after it is in place.
Liquid tape (option) to seal all connectors.
Add-a-Circuit with a 5 amp fuse for Acc power line to run led DRL every time car is in Acc position.
14 or 16 gauge wire, Flex tubing (12ft or longer), Quick Connects.
Most of items above can be found at Wal-Mart.

Finally, the led DRL from exLED. Those who want this led DRL changes from white color to amber when make a turn signal should order with additional TPC ver.2.
exledusa.com
Step 1:
Make sure the led DRL shipped to you are working fine before remove the front bumper. The led DRL bar has 3 small wires in black, white and yellow color. Black wire is common negative. White is positive wire for DRL, and yellow is positive wire for amber turn signal led. Plug in the household ac-dc adapter, make sure you know on the dc-in plug which one is negative and positive by look at the label on the transformer, then while touching the black wire to negative of dc-in plug, touch the white wire from led DRL bar to the positive of dc-in plug, all white leds should lit now. Do same to test amber led and use yellow wire instead of white wire. Assume that nothing goes wrong then move to next step.

Step 2:
Remove battery connectors
Refer to this video to remove the front bumper:
Step 3:
Remove 1 plastic clip and 4 screws to take the headlight out. You will need a ratchet with an extension at least 6 inches to remove a bottom screw under strip light on the horn side. If it is too hard for you to get the whole headlight assembly out then refer to the video to take the bumper off for easier. Remove all harnesses, bulbs. Take left and right headlight out by slightly lift up and toward the front.
Step 4:
There is a logo ExLed on the TPC module. Wires from letter E are input, and the other side is output. Connect 3 wires from output on TPC module to the same wire color on the led DRL bar. Use soldering iron to solder 3 wires in same color together. Tape around all 3 wires to be 1 harness with electric tape. For those who doesn't want to use the amber led to be additional turn signal then just make the harness with electric tape from led DRL to about 4 inches to the end ( you don't order TPC module anyway). Use pliers to clip a male connector to each wire.

Step 5:
Drill the strip light socket hole wider for sliding the led blocks into strip light space using a 1/4" or bigger bit.

Step 6:
Slide led DRL bar into the hole. The bar is slightly curve in the bottom to fit perfect in. Make sure the led blocks face to front so you can see the lights,
Step 7:
Test leds again using step 1. If it is OK then while holding the harness, seal the hole with Quiksteel Epoxy Putty. Continue to hold the harness for 5 minutes to set the putty. Test leds one more time. Use liquid tape to double seal the putty and blend the color to black as headlight housing.
Step 8:
Make a short 1 foot ground wire with a female connector on one end. Attach the other end to car chassis.
Step 9:
On the left under driver sidekick, there are 3 black rubber holes. Remove the bottom one. Run ACC power wire to the front left fender by using a metal clothing hanger, straight it out and tape the wire to one end. Take 2 clips off on the small part close to driver side wiper then lift it up so you can see the hanger. Pull the hanger to front with ACC power wire all the way to the left headlight (passenger side). Use Flex Tubing to cover this power wire. Tap a short wire from this ACC power wire for right headlight DRL. Connect a female connector to each of these ACC power wire.
Step 10:
Tap a wire to the turn signal. There are 3 wires in that harness, and the wire in Blue/Gray is turn signal wire. Connect a female connector to the other end.
Step 11:
Pull fuse number 37 under driver sidekick panel. Plug that same fuse to Add-a-Circuit slot. Add a 5 amp fuse to other slot (straight to the red wire out). Connect battery cables. Turn the car key to ACC position only, don't crank the engine. Test the headlight DRL by plugging the ground wire from headlight to the female connector you attached to car chassis, and plug the ACC power wire to the male connector of the white color. The DRL should light. Test amber led turn signal on the led bar by turning on right turn signal lever then plug yellow wire with male connector to the female on tapped wire. The led on DRL should change to amber color and blink. Do the same test for left lights.
Step 12:
Do the same for left headlight.
Step 13:
Now, your job is using electric tape to tape all the wires and connectors. Make them neat and clean. Tied wrap or tape them to other nearby harness. Mount the headlight assembly units back. Mount the bumper back. DON'T FORGET TO PULL OUT FUSE # 2 on sidekick panel to disable factory DRL function.
Enjoy your new led DRL and save $.
Note: sorry, I have more pictures from step 6, but it said I only can upload max 5 files.
")


