

I’ve done several removal/installs of the front door glass quite easily. So when my niece had her left rear window smashed on her 2000 4dr Accord, I offered to save her some money by replacing it. But I was totally stumped at trying to get the glass in. I just could not for the life of me get that sucker in, no matter what angle I tried! The fronts are easy as pie, but the rears are a pain in the rear.
I was only able to find one poorly-made youtube on how to remove the glass, but it didn’t show me how to install it. Anyway, I figured it out and I’d thought I’d post for others. It was fairly easy once I got the concepts down. Some tips are extremely helpful to know. Anyway, I got it done...
I ordered a new window for $50 with free shipping (tempered, factory tinted). After removing the obvious door latch, door switch, panel, I removed two 10mm bolts holding the window. Then the fun began of getting all the glass out. I used a shop vac and a long flat-blade screwdriver and toothbrush taped to a long stick to get the chips out of the crevices and push them into the shop vac zone. Chips were everywhere.
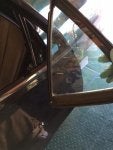
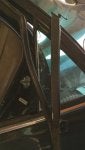
To install (or remove an intact) rear door glass, you basically have to remove the fixed, “corner window.” To do that, you need to remove the entire “rear” vertical door glass guide—the one closer to the trunk:
1. Remove the lower 10mm bolt to the rear guide.
2. Remove the upper (or “midway”) 10mm bolt. Before you remove this, pay attention to the 1 ½” bushing just behind this bolt. It has wings on it and basically goes between the door metal and the guide. Let the bushing drop after removing the bolt. You can easily retrieve it by hand or pliers inside the door. When you put this bolt back later, you will need long pliers to hold the bushing in place while you re-insert the bolt. It’s easy to grab it by the wings of the bushing.
3. Now you have to remove part of the softer door gasket just above the corner window. You don’t have to take it all out, just enough to get to the very top area of the guide. There is a small screw on the top. Remove this and the guide is free.
4. Now, remove the guide all the way out the door. Remove ONLY some of the door to glass gasket--just enough to remove the guide all the way out of the door. You’ll be leaving the gasket on the guide and letting it dangle outside the door for a bit. I don’t have many pics, but the ones I have says it all.
5. The corner window glass is held by the small screw and a “clip” that’s clearly visible in one of my pics. Wiggle it out of the clip and the corner window is free.
6. “Reverse” the process is NOT in order. LOL. The new glass now has plenty of room. Drop it in, bolt the two 10mm glass bolts (temporarily connect the window switch so you can raise or lower the glass until you have access to these areas.) Then lower the window all the way down.
7. Re-install the corner glass window, clipping it in.
8. Now insert the guide between door glass and the corner window glass. Make sure the glass is inserted into the guide’s gasket!!!
9. At this point, GINGERLY move the window up and down slowly to see if it’s seated properly. This will allow you enough wiggle room to get the gasket on right if it’s not. Once it looks, good…
10. Install and hand tighten the lower 10mm bolt. Do not bolt all the way.
11. Get long pliers, hold the winged bushing, insert between the door metal and guide, and install the mid-10mm bolt. This took me a few tries as mostly I’m working blindly trying to align the hole of the bushing.
12. Now you can tighten the top small screw and fully seat the two 10mm guide bolts in place. Gingerly move the window up and down.
Some tidbits:
Sorry about the lack of more pics. This posting was an after thought.
Eric the Car Guy has a great video on removing and installing a whole brand new door glass gasket on a non-Honda, and even lubing a new (or old gasket) with silicon. I didn’t feel so adventurous.
Make certain you fully seat the softer, fixed window gasket into the two different grooves…I used my plastic pry tools.
The goopy stuff holding the vapor barrier got all over: I got some on our garage carpet and some on the seat and car body. I removed it with a paper towel soaked in paint thinner. Afterwards, soak the towel in water, place in the a plastic bag, and throw in garage bin outside. Note to myself: slap some wax paper on to cover the goop on the door while you're working.
Shattered glass kept coming out of the water holes at the bottom of the door while I was vacuuming. Every time when I thought I was done, there was a shard or two on the ground. It took me forever to get everything out. Just for fun I left a few inside the door for the next guy.
Well, I hope someone can benefit from all my misadventures. Chime in if you’ve done this or can offer something else I may have missed!
I was only able to find one poorly-made youtube on how to remove the glass, but it didn’t show me how to install it. Anyway, I figured it out and I’d thought I’d post for others. It was fairly easy once I got the concepts down. Some tips are extremely helpful to know. Anyway, I got it done...
I ordered a new window for $50 with free shipping (tempered, factory tinted). After removing the obvious door latch, door switch, panel, I removed two 10mm bolts holding the window. Then the fun began of getting all the glass out. I used a shop vac and a long flat-blade screwdriver and toothbrush taped to a long stick to get the chips out of the crevices and push them into the shop vac zone. Chips were everywhere.
To install (or remove an intact) rear door glass, you basically have to remove the fixed, “corner window.” To do that, you need to remove the entire “rear” vertical door glass guide—the one closer to the trunk:
1. Remove the lower 10mm bolt to the rear guide.
2. Remove the upper (or “midway”) 10mm bolt. Before you remove this, pay attention to the 1 ½” bushing just behind this bolt. It has wings on it and basically goes between the door metal and the guide. Let the bushing drop after removing the bolt. You can easily retrieve it by hand or pliers inside the door. When you put this bolt back later, you will need long pliers to hold the bushing in place while you re-insert the bolt. It’s easy to grab it by the wings of the bushing.
3. Now you have to remove part of the softer door gasket just above the corner window. You don’t have to take it all out, just enough to get to the very top area of the guide. There is a small screw on the top. Remove this and the guide is free.
4. Now, remove the guide all the way out the door. Remove ONLY some of the door to glass gasket--just enough to remove the guide all the way out of the door. You’ll be leaving the gasket on the guide and letting it dangle outside the door for a bit. I don’t have many pics, but the ones I have says it all.
5. The corner window glass is held by the small screw and a “clip” that’s clearly visible in one of my pics. Wiggle it out of the clip and the corner window is free.
6. “Reverse” the process is NOT in order. LOL. The new glass now has plenty of room. Drop it in, bolt the two 10mm glass bolts (temporarily connect the window switch so you can raise or lower the glass until you have access to these areas.) Then lower the window all the way down.
7. Re-install the corner glass window, clipping it in.
8. Now insert the guide between door glass and the corner window glass. Make sure the glass is inserted into the guide’s gasket!!!
9. At this point, GINGERLY move the window up and down slowly to see if it’s seated properly. This will allow you enough wiggle room to get the gasket on right if it’s not. Once it looks, good…
10. Install and hand tighten the lower 10mm bolt. Do not bolt all the way.
11. Get long pliers, hold the winged bushing, insert between the door metal and guide, and install the mid-10mm bolt. This took me a few tries as mostly I’m working blindly trying to align the hole of the bushing.
12. Now you can tighten the top small screw and fully seat the two 10mm guide bolts in place. Gingerly move the window up and down.
Some tidbits:
Sorry about the lack of more pics. This posting was an after thought.
Eric the Car Guy has a great video on removing and installing a whole brand new door glass gasket on a non-Honda, and even lubing a new (or old gasket) with silicon. I didn’t feel so adventurous.
Make certain you fully seat the softer, fixed window gasket into the two different grooves…I used my plastic pry tools.
The goopy stuff holding the vapor barrier got all over: I got some on our garage carpet and some on the seat and car body. I removed it with a paper towel soaked in paint thinner. Afterwards, soak the towel in water, place in the a plastic bag, and throw in garage bin outside. Note to myself: slap some wax paper on to cover the goop on the door while you're working.
Shattered glass kept coming out of the water holes at the bottom of the door while I was vacuuming. Every time when I thought I was done, there was a shard or two on the ground. It took me forever to get everything out. Just for fun I left a few inside the door for the next guy.
Well, I hope someone can benefit from all my misadventures. Chime in if you’ve done this or can offer something else I may have missed!


")


