

Well, I just finished installing my XM radio in my 8th gen Sedan, and thought I'd take a few pics and share some of what I learned with everyone here.
The receiver I chose was the Commander MT from Audiovox, mainly due to the fact that the display was separate from the tuner, thus lending itself to a more low-key install. I decided I would mount it in the sunglasses holder in the headliner, and gained my inspiration from This thread, but did it a little differently.
When I first undertook the install, I created This post, asking for advice on which fuses were key switched, but didn't really get too many replies, so I had to figure it out on my own. Here's what I found:
![Image]()
Fuse slots 1 and 2 on the Driver's side fuse box are both key switched, as well as slot 13. I used slot #1 for my XM radio, and slot #13 for the power adapter on my GPS. I used the little Add-A-Fuse deals you can get at just about any auto parts store. I also chose to forego the usual wire-crimping hardware included with kits like this, opting instead to solder everything and use shrink-tube, to ensure longevity of the connections.
I didn't take any progress shots, because I did most of it at night, and I wasn't sure how well they would turn out. As it is, It mounted incredibly flush and tight. Here's how it looks now:
![Image]()
The reason I chose to install it in the sunglasses holder is so that when I park my car I can just close it up and no one is the wiser. No cords going everywhere, and most importantly, nothing gaudy mounted on my dashboard. To mount it I used the supplied mounting plate, and fabricated a spacer from mounting board and black felt to make it look stock. (You can't really see much of it, but I think that it speaks to how well integrated it is. But if you look closely along the bottom edge, you can see the spacer and the felt in which it is wrapped.) From there I drilled a small hole in the top of the sunglass holder, and ran the cable along the headliner and down the A-pillar to the receiver, which is mounted alongside the driver's side fuse box.
I also needed to run the Aux-out cable to the center console, and I used This thread to learn how to pop off the trim and not break any of the clips.
It turned out incredibly well. I mounted the antenna in the middle of the dashboard against the front windshield, and reception is great. Also, I wired a second power outlet and stashed it in the headliner, on the passenger's side. I did this so I could power my TomTom, but the reason I wired up a whole power outlet rather than just hardwire the adapter itself for the TomTom was in case I get a new one with a different adapter, I can just pop out the console and swap them. Easy enough.
Next up on the mod list is to wire up a switch so I can listen to either XM or my iPhone through the one Aux input. I have one on order, and it should be here by monday. After that, we do a hard-install of the iPhone charger (I'm thinking about the Kensington LiquidAux for this one) and then on to a Parrot 3100 bluetooth kit, which I will probably do around Thanksgiving. With luck, they will all be as straightforward as this install was (though I'm not holding my breath.)
Thanks for looking, everyone, and I welcome any comments!
The receiver I chose was the Commander MT from Audiovox, mainly due to the fact that the display was separate from the tuner, thus lending itself to a more low-key install. I decided I would mount it in the sunglasses holder in the headliner, and gained my inspiration from This thread, but did it a little differently.
When I first undertook the install, I created This post, asking for advice on which fuses were key switched, but didn't really get too many replies, so I had to figure it out on my own. Here's what I found:
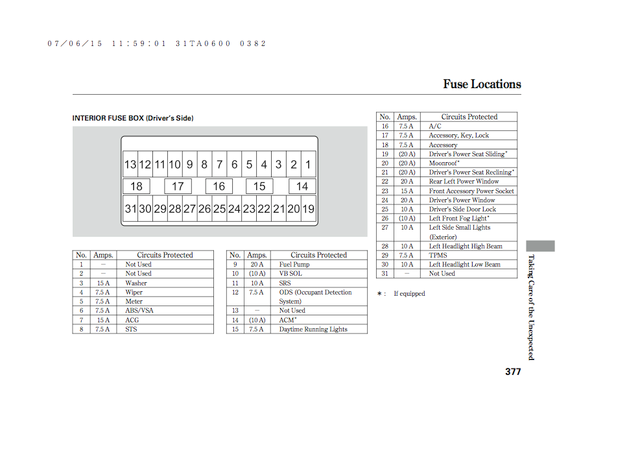
Fuse slots 1 and 2 on the Driver's side fuse box are both key switched, as well as slot 13. I used slot #1 for my XM radio, and slot #13 for the power adapter on my GPS. I used the little Add-A-Fuse deals you can get at just about any auto parts store. I also chose to forego the usual wire-crimping hardware included with kits like this, opting instead to solder everything and use shrink-tube, to ensure longevity of the connections.
I didn't take any progress shots, because I did most of it at night, and I wasn't sure how well they would turn out. As it is, It mounted incredibly flush and tight. Here's how it looks now:

The reason I chose to install it in the sunglasses holder is so that when I park my car I can just close it up and no one is the wiser. No cords going everywhere, and most importantly, nothing gaudy mounted on my dashboard. To mount it I used the supplied mounting plate, and fabricated a spacer from mounting board and black felt to make it look stock. (You can't really see much of it, but I think that it speaks to how well integrated it is. But if you look closely along the bottom edge, you can see the spacer and the felt in which it is wrapped.) From there I drilled a small hole in the top of the sunglass holder, and ran the cable along the headliner and down the A-pillar to the receiver, which is mounted alongside the driver's side fuse box.
I also needed to run the Aux-out cable to the center console, and I used This thread to learn how to pop off the trim and not break any of the clips.
It turned out incredibly well. I mounted the antenna in the middle of the dashboard against the front windshield, and reception is great. Also, I wired a second power outlet and stashed it in the headliner, on the passenger's side. I did this so I could power my TomTom, but the reason I wired up a whole power outlet rather than just hardwire the adapter itself for the TomTom was in case I get a new one with a different adapter, I can just pop out the console and swap them. Easy enough.
Next up on the mod list is to wire up a switch so I can listen to either XM or my iPhone through the one Aux input. I have one on order, and it should be here by monday. After that, we do a hard-install of the iPhone charger (I'm thinking about the Kensington LiquidAux for this one) and then on to a Parrot 3100 bluetooth kit, which I will probably do around Thanksgiving. With luck, they will all be as straightforward as this install was (though I'm not holding my breath.)
Thanks for looking, everyone, and I welcome any comments!


