Honda Accord Forums - The DriveAccord community is where Honda Accord 2003+ owners can discuss reviews, service, parts, and share mods. banner
1 - 20 of 30 Posts

ryanb203

· Registered
Joined
·
31 Posts
Reaction score
30
Location
Bridgeport, CT
Discussion starter · #1 ·

Hello all! Last year I was involved in an accident and have since been riding around with a completely destroyed front end. Well, a year later, I finally have sufficient funds to repair my front. However, versus replacing the now outdated 9th gen front. I opted into sourcing parts off a 9.5 gen front and doing the conversion. I have now purchased all parts. Waiting on some in the mail, and should be test fitting in few days. I will list part numbers for the front when i have the chance. part numbers for rear are listed. I ended up doing rear as well. All parts were ordered online or through craigslist.

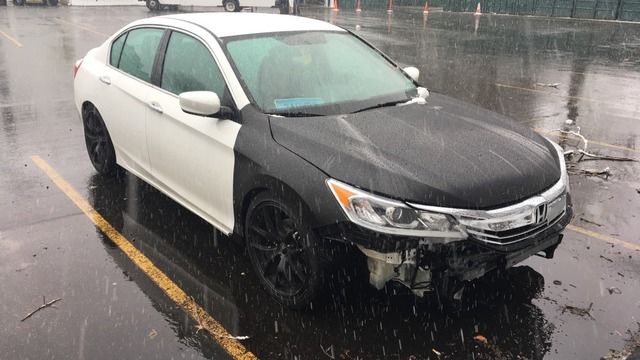
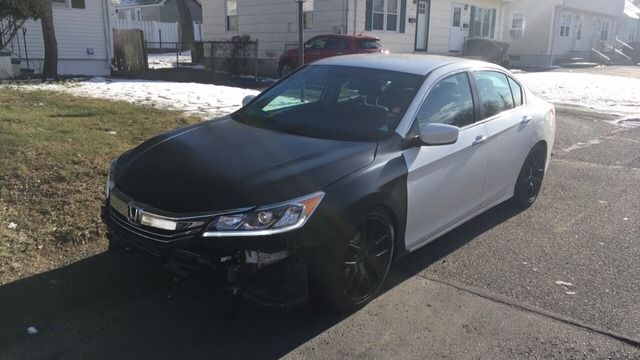
How my car is now. I removed bumper to test fogs, but this is how it looked after the accident, bumper ripped off and all. Damage to fenders, bumper, headlights, grill, and hood.

Image


Parts I have got so far. There is no DIY for this so I buy as time goes on. i have fenders, bumper, fogs, trim for front and rear, harness for fogs, rear reflectors, and headlights in my possession. Rear bumper, bumper reinforcement, fender liners, hood, and grille are on their way in the mail.

Image


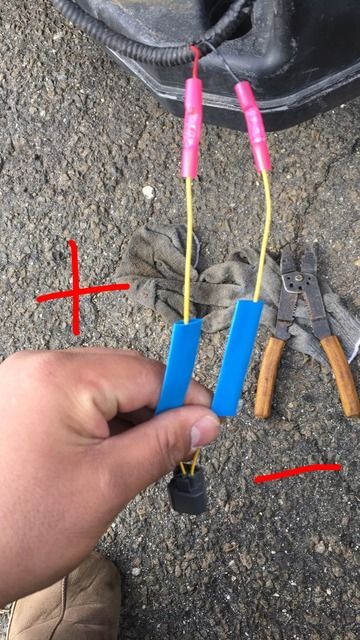
I had to make my own foglight harness as they don’t sell them anywhere from what I have seen and I did not want to splice my stock harness.

Image


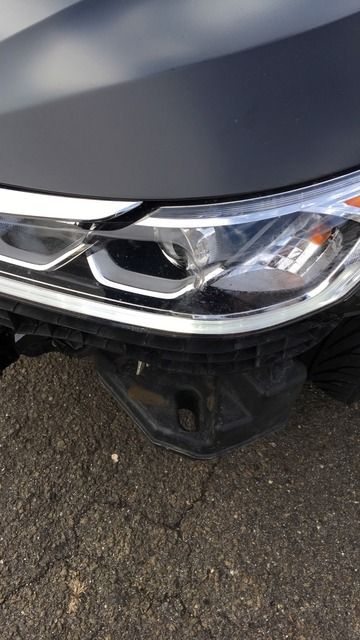
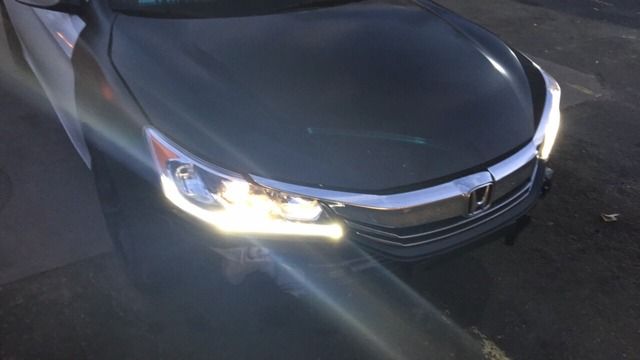
They are amazing! super crisp and incredibly bright.Top line is the foglight

Image


Image


In case you are wondering what it takes to convert the rear and front from 13-15 to 16-17. Part numbers and estimates included for rear...

Rear Taillight conversion from 13-15 to 16-17

Taillights: 390 shipped on eBay for OEM rep
34155-T2A-A21, 34150-T2A-A21, 33550-T2A-A21, 33500-T2A-A21

Rear trim: 74890-T2G-A31 105$-115$ anywhere

Wire harness (Sport/LX only): $200.00 on HTG

Total Cost: 705.00

Rear Bumper Conversion from 13-15 to 16-17

Rear bumper: Aftermarket 240$ on APW
71500-T2F-A80ZZ

Lower trim: $8.45 on Hondapartsnow.com
71502T2FA50

Middle trim: $72.33 on Hondapartsnow.com
71503-T2F-A51

Rear reflectors: 35$ on eBay shipped
33505T2AA11, 33555T2AA11

Total Cost:350-550 before paint

FRONT END to be continued… (rough estimates)

Hood 300-500$

Headlights 250-500$

Front bumper with trims
300-500

Grille-100-250$

Wiring harness for sport and lx model. EX V6 with LED DRL are plug and play for headlights - 200$

foglight harness cost 40$ or less to make. I used harness from lX add-on fogs part#08V31-T2A-1003A and a female h8 adapter and the passenger side harness from the 13 sport accord. Very easy and inexpensive to make.

 
Discussion starter · #4 ·
While you at it you might as well install the 9.5 gen Touring LED headlights instead of the halogens
Theyre 600-800 a piece for sedan. Thats more than I spent on the entire front. Too rich for my blood. :|

I was hoping this would be about a coupe and not sedan. So many people have already done this with sedans, but I can't find 1 person who has done the front conversion on a coupe. :(
Its been done on the coupe before. Someone a few cities over has a blue coupe with touring front end. Another guy online has a red one I believe.
 
Discussion starter · #6 ·


Picked up some more parts. Have the entire front end including hood and grille and now have the rear end minus taillights and upper chrome trim which i may not even do.

Image


Image


Ended up changing my rotors and pads just cause I felt a little vibration from up front when braking and my alignment and axle was just done/replaced.

Image


Installed the fenders today, perfect fit. Doing the hood and headlights (although wiring isnt complete) later tonight.

Image


Image


Discussion starter · #7 ·


So I got around to install the rest of the parts minus bumper. Still needs to be aligned and none of the seals are installed.


Was also able to wire in the DRL. Still need the turn signal plug for one side but i messed around with it and that will be an easy install. DRL are very bright at night and barely noticeable during the day. I believe it is on the dim setting. Cant imagine what the bright is like.


Do you mind doing a wiring guide on the headlights and foglights? I wanna do this in the future. Is it as simple as splicing two connectors (i.e. old headlight/foglight harness spliced to new headlight/foglight pigtail connectors)? No extra relay required? The wiring diagram for the 9th gen foglights have two separate harnesses for left and right foglights while the 9.5 gen has one foglight wiring harness going to both foglights. I know HardTopGuy has the conversion harness wiring to go from 9th gen headlights to 9.5 gen headlights but I was wondering mostly about foglight wiring.

If I'm understanding you correctly, you used the 2016 LX add-on foglight harness wired to only the driver side foglight. Leaving your passenger foglight connector from this same wiring harness disconnected? And your existing 2013 passenger foglight harness spliced to an h8 female connector which connects to the passenger side 9.5 foglight?

Also, I remember reading that the exhaust tips/mufflers on the 9.5 gen hang lower due to the taller rear bumper cover. So in case you didn't know, you might have to get custom exhaust piping or switch to 9.5 gen dual exhaust but don't quote me on that, not entirely sure.

Can't wait to see the final results and paint! The drilled and slotted rotors look nice too.
 
Discussion starter · #9 ·
Do you mind doing a wiring guide on the headlights and foglights? I wanna do this in the future. Is it as simple as splicing two connectors (i.e. old headlight/foglight harness spliced to new headlight/foglight pigtail connectors)? No extra relay required? The wiring diagram for the 9th gen foglights have two separate harnesses for left and right foglights while the 9.5 gen has one foglight wiring harness going to both foglights. I know HardTopGuy has the conversion harness wiring to go from 9th gen headlights to 9.5 gen headlights but I was wondering mostly about foglight wiring.

If I'm understanding you correctly, you used the 2016 LX add-on foglight harness wired to only the driver side foglight. Leaving your passenger foglight connector from this same wiring harness disconnected? And your existing 2013 passenger foglight harness spliced to an h8 female connector which connects to the passenger side 9.5 foglight?

Also, I remember reading that the exhaust tips/mufflers on the 9.5 gen hang lower due to the taller rear bumper cover. So in case you didn't know, you might have to get custom exhaust piping or switch to 9.5 gen dual exhaust but don't quote me on that, not entirely sure.

Can't wait to see the final results and paint! The drilled and slotted rotors look nice too.
I can tell you how to wire fogs on a 2013-15 accord sedan that already has fogs. For LX, you would first need to install fogs and then you can follow this guide for wiring the 16-17 after installing the main harness. For coupe it most likely is the same as well.

Parts needed for 16-17 fog install on a 2013-15 sport/ex/ex-l/touring sedan(I know for sure sport, idk about the others):

Fogs:
no part number but all sedan fogs are the same. Check eBay or Clist. I paid 100$ on Clist.

08V31-T2A-1003A - 25$ - 2016 fog light wire harness for LX. This is what Honda sells when people are looking to install fogs on their 16-17 LX models. I used this cause my used fogs did not come with the little pigtails that some come with, that plug directly into the fogs. If yours came with the 4 inch long wire then you do not need to buy this. For those of whom do have the little wire. The wires inside the wire/harness will be blue and black versus the red and black on the previously mentioned LX harness that i used. Blue is positive, black is negative.

33955-T2A-A01
- 10$ - This is a short wire that connects the chassis main fog harness to the actual foglight on the driver side only. You do not need to buy this. It is already on your car if you have fogs and if you don't have fogs then you don't need to because if you install fogs there will be a different wire in its place. Mine was damaged in the accident so i had to buy it. Mentioned it as a resource in case you get confused and want to see what wire I am referring to.

An H8 extension cable/adapter/harness 5-10$ on ebay. Search "h8 extension cable". This will be used on the passenger side.

Driver side: There is a short wire (1 foot long) that runs from the foglight itself to the chassis where it connects to another wire that is the main harness for the fog.Take that wire. The end that connects to the main harness, A GRAY PLUG. We are going to keep that side. Cut off the h8 end. Take the driver side of the foglight LX harness for 16-17. Cut off the half for the driver side that plugs into the fog. Wire colors should now be red black on both ends. Connect wires using waterproof butt connectors or something of that sort to protect from water. That is it for driver side.

Passenger side: There are a few ways you can do this but I used the adapter as to not cut into the stock harness. What you will do is take the female end of the h8 extension. That is the end we are going to use. Then you will keep the end of the 16-17 harness that plugs into passenger side and keep that. Connect those together, again red with red, black with black. Or Blue with red black with black. Then you plug the female h8 into the male h8 that is already on the fog harness that came with your car.


So you will now have two harnesses adapters. One that plugs into passenger and one that plugs into driver side. Fogs are bright and beautiful. i do not believe you need a relay if you are using the stock wiring that came with your car. Good luck!


P.S. in regards to the exhaust hanging lower, I can neither confirm or deny. I have a Borla and i know for a fact that the exhaust fits 13-17 sedans. I sold one to somebody with a 16 and it fit perfect so I think i should have no issues.
 
Discussion starter · #10 ·


So guys, good news! I was able to install the remainder of the front end. Still have a few odds and ends but so far so good. Functional headlights signals everything and the fogs as well.

Image


Installed LED headlights, went with nighteye as it was the the highest quality cheap option I could find. So far I love them and they match perfectly.

Image


Image


Switchbacks wired up. For future reference, wiring is the same as 13-15, just have to switch the location of red and green as far as order goes on the socket. So red goes where green goes just for the turn signal. I have no pics sorry, it was a headache because of the switch backs.

Image


While putting on the bumper, I realized the grill goes on first lol.

Image


And there you have it parts wise 97% complete. Now just waiting on the paint and bodywork.

Image


Beautiful!

Image


Image


Discussion starter · #13 ·


Hello All,

I got around to installing the rear bumper with trim and lowering rear a bit more to even it up with the front. Fits perfect and looks great. Definitely dislike the black on the rear so I will paint that before the front. Costs less too. Exhaust also hangs lower on 16-17 as someone had mentioned to me previously thought it wouldn't but it does. Will most likely bend hangers or modify the bushings.

Image


Image


Image


Image


It was also my birthday week so I decided to buy myself some wheels. Aspire Motoring has these listed for a 1000$ less than other sites. Came very well packaged and ended up being new although they described it as new with flaws (there were none), they were used for a photoshoot and only one box was open. Check them out on eBay they're selling a bunch of wheels used for a photoshoot, 400-600$ shipped for a set.

Image


Image


Image


Image


Discussion starter · #16 ·
Looking good....is there some panel alignment and gap issues with the hood and front fenders?
Thanks man and definitely due to the crash the left side is off a bit. I also installed the parts at night and didn't bother to align them. The body shop will straighten everything out. The parts them selves fit perfect.

You are a rockstar. Nice job!
Thanks you I appreciate it. A lot of work but almost done now. Putting this all up for others looking to do the same as there was close to 0 info on how to do any of it nor many pictures.
 
Discussion starter · #18 ·
It does not need to be replaced. Mine were previously damaged.
 
1 - 20 of 30 Posts