Hi folks,
I had the same problem and took apart the heater control module to see if I could fix it before dropping $300 on a new one-- in fact, mine was fixable with one jumper wire and a soldering iron. Read on.
Symptoms:
Only the blower motor speed knob worked. None of the vent buttons, A/C button, or the lights work.
Quick solution:
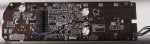
On the underside of the board, just jumper the input (leftmost) leg of the 78dl05 voltage regulator in the middle of the board to the positive leg of capacitor C1. That's it.
Long story:
Since the whole panel went dead all of a sudden, with nothing working, I pried open the module with a small flat head screwdriver, and pulled the knobs off.
I tested the 5v regulator which supplies 5v power using the 12v from the battery. The part is 78dl05 and it is in the middle of the board.
It was not outputting 5v, so I next checked if it was receiving 12v.
Pin 1 Input (12v)
Pin 2 output (5v)
Pin 3 Common (ground)
Pin 1 of the harness is +12v, and the ground pin is in the very middle all by itself. The board was receiving +12v. So that means that there is an open circuit somewhere between the regulator and the connector.
So I traced back from the input leg of the 78dl05 to the connector CN1. The first through hole was covered in greenish blue corrosion. It is located underneath a rubber strip directly below the 78DL05, which is why I didn't spot it immediately. I wouldn't be surprised if this is how most of these boards fail.
The only other thing between the input leg and the connector CN1 is a capacitor, C1. It looked fine (wasn't burst or leaking). I could have attempted to fix the through hole in the board, but it would likely die again, so I decided to just jumped the input leg to the capacitor, which provides a handy place to solder to.
I jumped the positive side of C1 to the input leg of the 78dl05 (left most leg, labeled in+ on the top side of the board) and then plugged it back into the harness, turned the car on, voila, all works fine.
$293 for the part from the Honda dealer and probably $100 more in labor-- you can do it yourself in 15 minutes if you have a soldering iron ($12 from Radioshack) and a couple of screw drivers. Stupid simple.
I just fixed a 2000 Accord LX with this snafu. The good news is that this is as close to plug and play for a fix as you can get.
You can look up how to access the radio for detailed directions but in a nutshell:
- Remove plastic shroud/surround in center of dash
*remove 2 screws at bottom
*FOr third scres, it's hidden behind the clock. Using a thin bladed knife (I used a kitchen knife wrapped in a paper ticcue to avoid scratshing) or screwdriver, pry the bottom of the clock out and pull the unit out. Unplug the wires and set aside. Take out 3rd screw behind in dash. Lift shroud from bottom out.
- AC control unit is mounted to the back of the shroud.
*Disconnect the 2 wiring harnesses from AC control unit.
*Remove the 5 mounting screws and remove AC unit panel.
*Before mounting new unit, lug in the 2 wiring harnesses and check operation...you should be good to go if the original part was the failure.
- Replace pieces in reverse order
Easy-Peasy...be careful and patient with those plastic pieces so you don't scratch them.