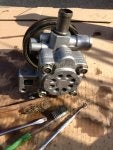
1998 Honda Accord, EX, 4 cylinder, F23A4, 172,000 miles, Smurf blue, original power steering pump
Power Steering Pump Leak Background:
I've had a persistent leak from my power steering pump the past several years that has gotten worse the past year. I couldn't figure out where it was leaking as it got grimy in several places on both sides of the pump, and fluid was leaking down onto the alternator and eventually on driver's side of the engine and to the back of it. I deduced that the pump is under pressure and could possibly be leaking AND the force of the pressure is making it mist/shoot out in odd places barring me from readily identifying the source of the leak.
I did a good wipe down every couple of months. A year or two ago I changed the high pressure hose o-ring just for the fun of it, but that was not the problem. Lately I found fresh fluid forming under the "back cover" of the pump. So I suspected it was leaking from there. I have never experienced noticeable performance or noise issues so I did not think the problem was the pump bearings going out. I suspected aging seals on the back (non-pulley side) of the pump.
There is a great video which I have cited below and which has been posted several times already on this forum and which was my source of inspiration. Although his car was a V6, the principle of changing internal pump seals was the same. I finally decided to tackle the problem and try to fix it, and to replace my 60,000 mile ps pump belt as well, which was well stretched to its limit.
I ordered three seals for the back side of the pump, along with the belt. I did not order the full seal kit, only the parts I thought I needed. The part numbers found on any parts auto parts diagram (under "power steering pump bracket") for this car are 15, 12, 14, and 4, respectively below. The OEM part numbers I ordered for my car were:
a. 91349-P2A-003 ("pump cover" seal). $7.57 (plus $500 shipping)")
b. 91347-P2A-003 (o-ring 15.2mm X 2.4mm) .37 cents
c. 91348-P2A-003 (o-ring 51.0mm X2.4mm) .76 cents
d. 56992-P0A-J01 (belt, BANDO) $15.46
The total I paid was about $34.
Here are the detailed steps I took to replace the three seals and belt:
1. Place towels underneath the pump. Ugh duh. Remove the high pressure hose (two 10mm bolts) and the supply, low pressure hose clamp/hose. Fluids will drip a bit. I had removed my fluid from the reservoir with a turkey baster. Save this fluid. More later in step 14.
2. On the "back cover" there are four 10mm bolts. Treat these like you would wheel lugnuts: break them loose now, remove the pump altogether, then take them off completely later. You'll have a much easier time to torque them loose while the pump is still fastened. I know you get it now.
3. I had to take out the engine oil filler tube to easier access and loosen the 12mm mounting bolt on the pulley side. The adjusting 12mm bolt on the back side was easy access, although I was barely able to fit my ratchet and socket in there without scraping the exhaust shield a bit. Use the smallest head ratchet if you have one. I learned to make sure the socket is seated squarely as you loosen the bolt, otherwise you will round off the bolt with the amount of force it takes. I think this is great practice anytime you have to exert a lot of force to loosen/tighten on any bolt. My socket initially sat just at a slight angle and I managed to round the bolt ever so slightly until I got smart about it. I guess I was concentrating too much on the force it took to loosen rather than keeping it square.
4. With the two 12mm bolts loosened, you can easily remove the belt. Totally remove these two bolts and your pump is now free to roam, too.
5. I used a flattened big box for my work area. You can clean the outside of the pump now or later. Better now. Just make sure you put a clean paper towel or something on both the high and low pressure hose inlet/outlets. I just used brake cleaner and some tools shown on one of the photos, but I suppose you can use a de-greaser if you are careful about not contaminating the hose connections.
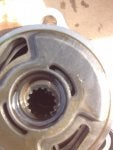
6. Remove the four 10mm back cover bolts but keep the cover on. Aren't you glad you broke them loose? Note: you do not have to take out the pulley. Place the pump back cover side down and carefully lift it off. I am NO expert, so I do not know my parts, but the idea is to keep the "cylinder" on the back cover when you lift off the pump. The cylinder has many parts, and many fins that can easily fall off if you're not careful. I got too curious and started removing the cylinder and its parts and two fins popped off! If this happens to you, make sure you orient the fins back properly: one side has sharp edges, the other rounded. Also, the "cylinder" has a gear thingy that free floats inside that will have to be aligned with the gear shaft when you re-assemble. Don't panic when seeing this, the two will mate later with a little care.
7. OK. Now the fun part. Take your dental pick and remove the three seals and replace them with the new ones. All three came out easy for me. Incidentally, why is there "fresh looking " yellow fluid inside the pump and yet my reservoir fluid is darker than merlot? I noticed my seal for part "a" above (diagram part #15) was flat and extremely firm; the new one was pliable and round. I think this one seal was the main source of the leak. Parts "b" and "c" (diagram parts 12 and 14) above were firm, too, and the new ones soft. It was a good choice to order these three seals--looks like they were all overdue for a replacement.
8. I had plenty of fluid inside the pump so it was easy to lube the seals when installing. I couldn't believe how firm and square they were, especially the main suspect/ring leader diagram part 15. Make sure you clean out the groove of this particular seal and both sides of the flats of the pump cover and pump.
9. With the cover side still down, re-insert the pump paying attention to the alignment of the gear shaft and gear mentioned in step 6. Take a final look at the seals to make sure they are still properly seated in place.
10. Finger tighten the four 10mm pump cover bolts but don't torque them fully just yet. Remember, treat these like your lugnuts: torque them after removing your jacks. I know you get it.
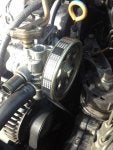
11. Mount the pump back in reverse order. Properly install your belt on the lower pulley; use a flashlight to make sure it's right. Use fresh clean gloves to handle the belt.
12. Finger tighten both the 12mm mounting and adjusting bolts. I did not have two ratchet sets so I couldn't use the square hole on the pump to exert pressure while I torqued down the adjusting bolt. Better still, I took a 2' pipe and wedged it underneath the pump and on top of the alternator and with that I got plenty of leverage. Torque down the adjusting bolt and then the mounting bolt. Funny, the final resting spot of the adjusting bolt indicated there still wasn't much room to tighten later. But, the old position for the old belt was maxed out, so I am still doing better.
13. Torque down the four 10mm cover bolts---I know you've been waiting for this. Tighten the high pressure hose clamp bolts and the low pressure hose clamp. I'm such an idiot--I placed my oil dipstick tube away from my work area and forgot to install it when turning on the car! Oil splattered a bit until I caught on. Do not make the same mistake and also think about changing out your dipstick o-ring as I plan to.
14. Refill the old ps pump fluid. Why the old? I made the mistake of filling with fresh fluid. It was awesome---clean, light colored fluid in the reservoir was quite a sight to see. But the honeymoon didn't last too long as the minute I turned on the car, it mixed with the existing fluid in the line and became a light cabernet color. So, I recommend you do a "flush" as I plan to do using about four bottles of the juice. I just saw an excellent video on how to do it. A project for later. Sorry, I will not be citing it here.
15. Raise the front end of the car and have one last look around. If it looks good, turn on your car. I heard an immediate swoosh and my pump was off and running! Immediately check and add more fluid if you have to. Now bleed the air out by pretending you're Racer X driving through some Italian mountains. Rotate the steering wheel back and forth for a couple of minutes. Recheck/add more fluid as appropriate. And keep rotating the wheel for 3-4 more minutes. Recheck/add more fluid. When the fluid level remains the same, you are done.
16. The next FEW DAYS keep checking for leaks. I had none...but, be forewarned: I used my finger and/or a fresh paper towel to swipe the entire surface of the back cover at the seams where it was leaking before and I found just a trace of wetness. Why? Well, when you put in #15 and lubed it, the fluid had to push out from the outer circumference of that seal and had to come out somewhere until it worked itself out, right? Anyway, the tiniest of the said fluid worked itself out in a couple of drives so keep checking and wiping. The final results for me?.....
....my power steering pump has been bone dry! NO MORE LEAKS!!! Sweet success. And maybe it's in my head, but I swear my steering is quieter and slightly more powerful now! But, most importantly, no more leaks!!!
Cost of replacing a pump NOT including labor by a shop:
New power steering pump: over $600
Auto Dismantler: I'm not a gambler, so I wouldn't know
Re-manufactured pump: over $260
Three seals I replaced: about $14
Experience doing this: Priceless.
Here is the video that inspired me. Again, it's for a V6 and mine is a four cylinder. But the idea of changing seals is the same.
Several of my own photos to follow...
Power Steering Pump Leak Background:
I've had a persistent leak from my power steering pump the past several years that has gotten worse the past year. I couldn't figure out where it was leaking as it got grimy in several places on both sides of the pump, and fluid was leaking down onto the alternator and eventually on driver's side of the engine and to the back of it. I deduced that the pump is under pressure and could possibly be leaking AND the force of the pressure is making it mist/shoot out in odd places barring me from readily identifying the source of the leak.
I did a good wipe down every couple of months. A year or two ago I changed the high pressure hose o-ring just for the fun of it, but that was not the problem. Lately I found fresh fluid forming under the "back cover" of the pump. So I suspected it was leaking from there. I have never experienced noticeable performance or noise issues so I did not think the problem was the pump bearings going out. I suspected aging seals on the back (non-pulley side) of the pump.
There is a great video which I have cited below and which has been posted several times already on this forum and which was my source of inspiration. Although his car was a V6, the principle of changing internal pump seals was the same. I finally decided to tackle the problem and try to fix it, and to replace my 60,000 mile ps pump belt as well, which was well stretched to its limit.
I ordered three seals for the back side of the pump, along with the belt. I did not order the full seal kit, only the parts I thought I needed. The part numbers found on any parts auto parts diagram (under "power steering pump bracket") for this car are 15, 12, 14, and 4, respectively below. The OEM part numbers I ordered for my car were:
a. 91349-P2A-003 ("pump cover" seal). $7.57 (plus $500 shipping)
b. 91347-P2A-003 (o-ring 15.2mm X 2.4mm) .37 cents
c. 91348-P2A-003 (o-ring 51.0mm X2.4mm) .76 cents
d. 56992-P0A-J01 (belt, BANDO) $15.46
The total I paid was about $34.
Here are the detailed steps I took to replace the three seals and belt:
1. Place towels underneath the pump. Ugh duh. Remove the high pressure hose (two 10mm bolts) and the supply, low pressure hose clamp/hose. Fluids will drip a bit. I had removed my fluid from the reservoir with a turkey baster. Save this fluid. More later in step 14.
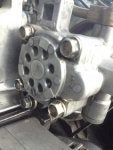
2. On the "back cover" there are four 10mm bolts. Treat these like you would wheel lugnuts: break them loose now, remove the pump altogether, then take them off completely later. You'll have a much easier time to torque them loose while the pump is still fastened. I know you get it now.
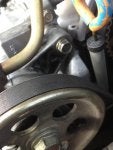
3. I had to take out the engine oil filler tube to easier access and loosen the 12mm mounting bolt on the pulley side. The adjusting 12mm bolt on the back side was easy access, although I was barely able to fit my ratchet and socket in there without scraping the exhaust shield a bit. Use the smallest head ratchet if you have one. I learned to make sure the socket is seated squarely as you loosen the bolt, otherwise you will round off the bolt with the amount of force it takes. I think this is great practice anytime you have to exert a lot of force to loosen/tighten on any bolt. My socket initially sat just at a slight angle and I managed to round the bolt ever so slightly until I got smart about it. I guess I was concentrating too much on the force it took to loosen rather than keeping it square.
4. With the two 12mm bolts loosened, you can easily remove the belt. Totally remove these two bolts and your pump is now free to roam, too.
5. I used a flattened big box for my work area. You can clean the outside of the pump now or later. Better now. Just make sure you put a clean paper towel or something on both the high and low pressure hose inlet/outlets. I just used brake cleaner and some tools shown on one of the photos, but I suppose you can use a de-greaser if you are careful about not contaminating the hose connections.
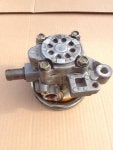
6. Remove the four 10mm back cover bolts but keep the cover on. Aren't you glad you broke them loose? Note: you do not have to take out the pulley. Place the pump back cover side down and carefully lift it off. I am NO expert, so I do not know my parts, but the idea is to keep the "cylinder" on the back cover when you lift off the pump. The cylinder has many parts, and many fins that can easily fall off if you're not careful. I got too curious and started removing the cylinder and its parts and two fins popped off! If this happens to you, make sure you orient the fins back properly: one side has sharp edges, the other rounded. Also, the "cylinder" has a gear thingy that free floats inside that will have to be aligned with the gear shaft when you re-assemble. Don't panic when seeing this, the two will mate later with a little care.
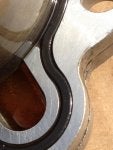
7. OK. Now the fun part. Take your dental pick and remove the three seals and replace them with the new ones. All three came out easy for me. Incidentally, why is there "fresh looking " yellow fluid inside the pump and yet my reservoir fluid is darker than merlot? I noticed my seal for part "a" above (diagram part #15) was flat and extremely firm; the new one was pliable and round. I think this one seal was the main source of the leak. Parts "b" and "c" (diagram parts 12 and 14) above were firm, too, and the new ones soft. It was a good choice to order these three seals--looks like they were all overdue for a replacement.
8. I had plenty of fluid inside the pump so it was easy to lube the seals when installing. I couldn't believe how firm and square they were, especially the main suspect/ring leader diagram part 15. Make sure you clean out the groove of this particular seal and both sides of the flats of the pump cover and pump.
9. With the cover side still down, re-insert the pump paying attention to the alignment of the gear shaft and gear mentioned in step 6. Take a final look at the seals to make sure they are still properly seated in place.
10. Finger tighten the four 10mm pump cover bolts but don't torque them fully just yet. Remember, treat these like your lugnuts: torque them after removing your jacks. I know you get it.
11. Mount the pump back in reverse order. Properly install your belt on the lower pulley; use a flashlight to make sure it's right. Use fresh clean gloves to handle the belt.
12. Finger tighten both the 12mm mounting and adjusting bolts. I did not have two ratchet sets so I couldn't use the square hole on the pump to exert pressure while I torqued down the adjusting bolt. Better still, I took a 2' pipe and wedged it underneath the pump and on top of the alternator and with that I got plenty of leverage. Torque down the adjusting bolt and then the mounting bolt. Funny, the final resting spot of the adjusting bolt indicated there still wasn't much room to tighten later. But, the old position for the old belt was maxed out, so I am still doing better.
13. Torque down the four 10mm cover bolts---I know you've been waiting for this. Tighten the high pressure hose clamp bolts and the low pressure hose clamp. I'm such an idiot--I placed my oil dipstick tube away from my work area and forgot to install it when turning on the car! Oil splattered a bit until I caught on. Do not make the same mistake and also think about changing out your dipstick o-ring as I plan to.
14. Refill the old ps pump fluid. Why the old? I made the mistake of filling with fresh fluid. It was awesome---clean, light colored fluid in the reservoir was quite a sight to see. But the honeymoon didn't last too long as the minute I turned on the car, it mixed with the existing fluid in the line and became a light cabernet color.
So, I recommend you do a "flush" as I plan to do using about four bottles of the juice. I just saw an excellent video on how to do it. A project for later. Sorry, I will not be citing it here. 15. Raise the front end of the car and have one last look around. If it looks good, turn on your car. I heard an immediate swoosh and my pump was off and running! Immediately check and add more fluid if you have to. Now bleed the air out by pretending you're Racer X driving through some Italian mountains. Rotate the steering wheel back and forth for a couple of minutes. Recheck/add more fluid as appropriate. And keep rotating the wheel for 3-4 more minutes. Recheck/add more fluid. When the fluid level remains the same, you are done.
16. The next FEW DAYS keep checking for leaks. I had none...but, be forewarned: I used my finger and/or a fresh paper towel to swipe the entire surface of the back cover at the seams where it was leaking before and I found just a trace of wetness. Why? Well, when you put in #15 and lubed it, the fluid had to push out from the outer circumference of that seal and had to come out somewhere until it worked itself out, right? Anyway, the tiniest of the said fluid worked itself out in a couple of drives so keep checking and wiping. The final results for me?.....
....my power steering pump has been bone dry! NO MORE LEAKS!!! Sweet success. And maybe it's in my head, but I swear my steering is quieter and slightly more powerful now! But, most importantly, no more leaks!!!
Cost of replacing a pump NOT including labor by a shop:
New power steering pump: over $600
Auto Dismantler: I'm not a gambler, so I wouldn't know
Re-manufactured pump: over $260
Three seals I replaced: about $14
Experience doing this: Priceless.
Here is the video that inspired me. Again, it's for a V6 and mine is a four cylinder. But the idea of changing seals is the same.
Several of my own photos to follow...