Honda Accord Forums - The DriveAccord community is where Honda Accord 2003+ owners can discuss reviews, service, parts, and share mods. banner
1 - 20 of 22 Posts

Duncan21

· Registered
Joined
·
79 Posts
Reaction score
0
Discussion starter · #1 ·
So I open the door.. like 5hours after it has rained.. and the bottom kick of the inside where the door sits is dipping wet!

2 weeks ago I noticed the same thing and it was dripping INSIDE THE CAR...

Anyone else have this prob? Drivers side door.
 
Include year and model in your signature line so people can provide help. :yes:

Oh yeah I almost forgot.... Welcome! :wave:
 
Discussion starter · #3 ·
Done! Thanks
 
It seems obvious that a seal is probably leaking somewhere. Do you open or crack your windows when it rains? I know that when I open my windows at all when it rains water comes pouring in, especially on the driver's side. Maybe the water is dripping down the inside of the door panel and collecting on the sill. I plan on getting the visors installed when I bring it in for the first oil change! Good luck. :) Is yours a coupe or a sedan?
 
Discussion starter · #6 ·
Mine is a sedan.. it's coming from like below the door.
 
Inner door seal may be missing or shrunken

There is a barrier seal inside the door between the door trim panel and the steel door shell. It is a thin membrane of white, transparent or semi-transparent plastic about twice the thickness of an industrial-strength garbage bag which is glued to the door shell at all points. If the vapor barrier, which surrounds the whole inside of the door, is missing, torn in spots, or seperating from the door shell, then water can enter into the car during heavy rain. It is natural for some water to leak past the window seals and the belt moldings at the base of the window. This water is supposed to be deflected by the barrier seal and then drain out the bottom of the door thru small drain holes. When you have the door apart, check inside the bottom of the door and make sure that there is no organic debris (leaves, pine needles, etc) blocking those drain holes. It is not to hard to take off the inner door trim panels and check if the vapor barrier is intact. Have you ever had the window replaced, by the way? There is another thread on this forum where the car owner happened to watch the glass technician take his door apart to replace the shattered glass. The technician ripped off the vapor barrier and told the car owner he "didn't need it"...
 
how do you take off the door inner panels off? My tinters did remove them to felt the weatherstrips, and the doors seem to be extra leaky :) When I wash the car, water goes all over place, on the door steps on all 4 doors, and front windows get wet inside and out when I roll them down and up afterwards... I wanna check if the seal integrity was compromised...
 
front door sedan 1 of 6

Special Tools Required
KTC trim tool set SOJATP2014
Trim pad remover, Snap-on A 177A or equivalent, commercially available
*Available through the American Honda Tool and Equipment Program; call 888-424-6857

4-door
NOTE: Use the appropriate tool from the KTC trim tool set to avoid damage when prying components.

Lower the glass fully.

Using a trim tool, pry out on the rear portion of the cover (A) to release the hooks (B, C), then remove the cover and the screws securing the inner handle (D).
 

Attachments

2 of 6

Remove the power window switch panel (A).

-1 Pry up on the rear edge of the switch panel with a trim tool to release the rear clip.
-2 Pull out along the edge of the panel to release the hooks (B) and front clip.
-3 Disconnect the power mirror switch connector (C) (driver's) and the power window switch connector (D).
 

Attachments

3 of 6

Remove the screw from under the pull pocket cap (A).

Remove the mirror mount cover.
 

Attachments

4 of 6

Remove the door panel (A) with as little bending as possible to avoid creasing or breaking it.

-1 Start at the bottom edge of the door panel, release the clips that are just above the marks (B) on the edge of the panel with a commercially available trim pad remover.
-2 Detach the upper clips.
-3 Starting at the rear, pull the door panel upward and over the lock knob (C).
-3 NOTE: The inner handle cable (D) and the courtesy light bulb socket (E) are connected to the door panel. Do not pull the door panel up too far, or the inner handle cable will be damaged.
 

Attachments

5 of 6

While holding the door panel (A) away from the door, disconnect the inner handle cable (B), and if equipped, courtesy light bulb socket (C), and detach the harness clip (D), then remove the panel. If necessary, remove the inner handle (E) by releasing the hooks (F, G).
 

Attachments

6 of 6

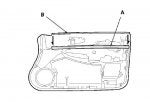
If necessary, remove the door glass inner weatherstrip (A) from the door panel (B) by pulling it down.

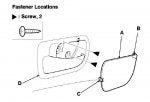
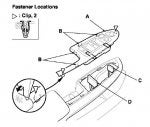
Install the door panel in the reverse order of removal, and note these items:

Check if the clip is damaged or stress-whitened, and if necessary, replace it with new one.

Make sure the connectors are plugged in properly, and the cable and the bulb socket are connected properly.

If equipped, make sure the window and power door lock operate properly.

Do the power window control unit reset procedure.

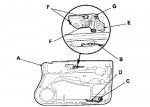
When reinstalling the door panel, make sure the plastic cover is installed properly and sealed around its outside perimeter to seal out water.

Check for water leaks.

*************************


They're all bacially the same.... remove the hardware, then the panel is held in with clips. Whether it's front or back, coupe of sedan.

Good luck & have fun!! :D
 

Attachments

The tool is easier & less likely to damage, but yes, you can use a flat head screw driver. I'd cover the end with masking tape or something along that line so you don't scratch stuff up.
 
It rains aLOT down here, i never had that problem, even driving through pretty deep flooded roads (never higher than 8in will i risk it.)...
 
1 - 20 of 22 Posts